This documentation page assumes that you already have a SeekTable account.
Create your free account by signing up.
Snowflake BI Tool for pivot tables, charts, tabular reports
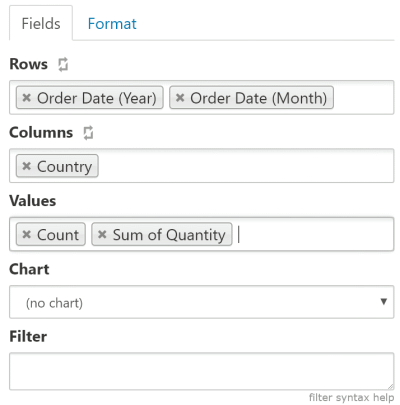
SeekTable is a self-service Snowflake BI tool that allows users to create pivot tables, charts, and flat table reports directly from Snowflake databases:
- Live Snowflake connection: report queries execute in real-time, meaning your operational reports always up-to-date (no need in refreshes).
- No ETL / zero data extraction: analyze massive datasets directly in your data warehouse, no data imports required.
- Designed for business users: Excel-like web interface enables non-IT users to perform fast data analysis and data visualization without writing SQL or exporting sensitive data.
- Governed data access: safely share common reports and data cubes with RLS. End-users queries are limited to configured data models (no direct SQL access to Snowflake).
- On-premise reporting tool: self-hosted SeekTable meets strict corporate compliance and data governance requirements. It supports fully isolated deployment environments to deliver real-time insights without your data ever leaving your internal network.
- Embedded BI: seamlessly integrate SeekTable published reports and dashboards directly into your web app. Or embed the entire SeekTable app view to let them build their own reports directly inside your app.
- White-labeling: apply your own logo, branding, and UI styles to make SeekTable look exactly like your company's own in-house reporting solution.
Setup Snowflake Connection
- Click the "Connect to Database" to open a new data cube configuration form.
-
Choose Data Source Type:
SQL-compatible database(this opens SQL Settings section). -
Choose Database Connector:
Snowflake
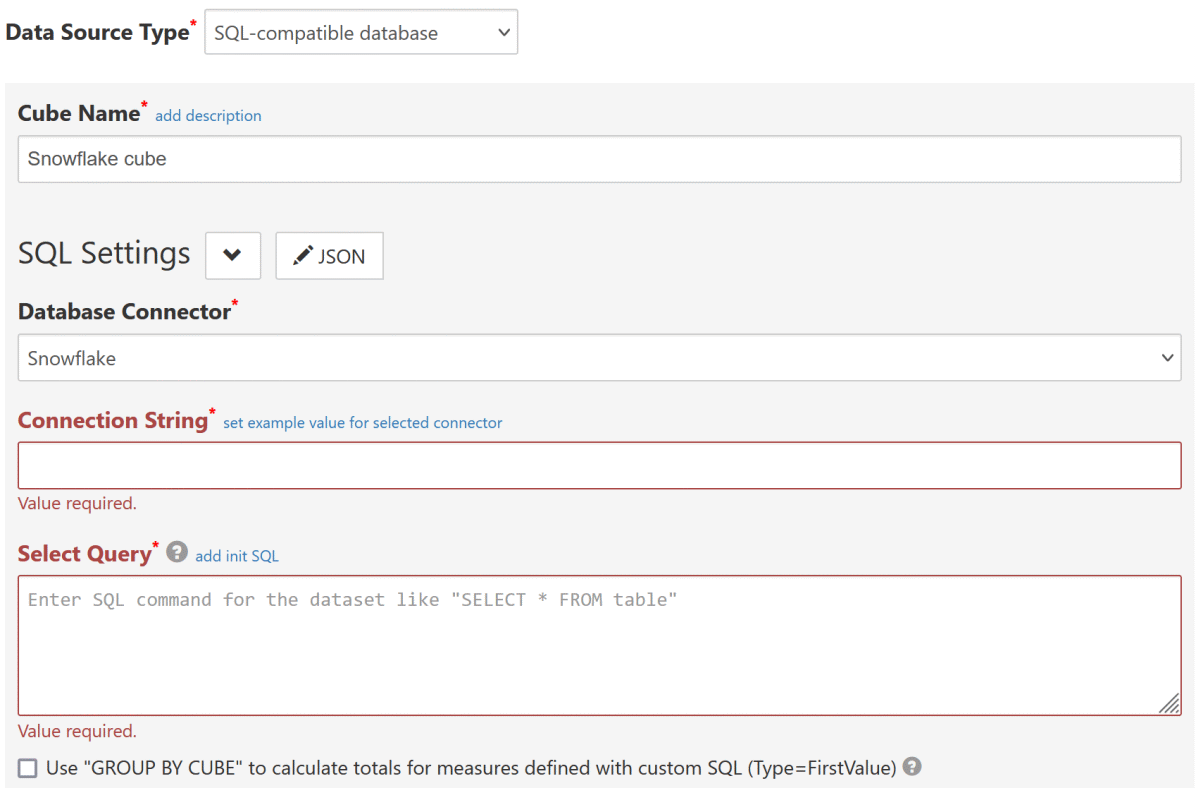
-
Connection String should be a valid connection string for Snowflake .NET driver. For example:
account=test;user=test;password=userpwd;warehouse=wh;db=snowflake_sample_data;host=test.snowflakecomputing.com;
account Required Account should not include region or cloud provider information. i.e. account should be XXX instead of XXX.us-east-1. user Required This should be the login name for your idp. password Required The password for the specified user. host Optional If no value specified, driver will use <ACCOUNT>.snowflakecomputing.com. However, if you are not in us-west deployment, or you want to use global url, HOST is required, i.e.XXX.us-east-1.snowflakecomputing.com, orXXX-jkabfvdjisoa778wqfgeruishafeuw89q.global.snowflakecomputing.com.warehouse Optional Specifies the default warehouse to use. db Optional Specifies the default database to use. schema Optional Specifies the default schema to use. role Optional Specifies the default role to use. - Configure other required settings as described in SQL-compatible data source. As a minimum you need to specify Select Query (which determine's the dataset) and keep Infer dimensions and measures by dataset checked.
Date-part dimensions calculated with SQL expressions
To define date-part dimensions (date's "year", "month", "day" etc) you may add dimensions defined with an appropriate SQL expression:
- add new dimension with Type=
Field - fill Name with some unique value: say, "date_column_year"
- add one Parameter which should be a date-part Snowflake SQL expression:
- For year:
YEAR(date_column) - For month:
MONTH(date_column)+ Format={0:MMM}(Jan, Feb etc) or{0:MMMM} (January, February etc) - For day:
DAY(date_column) - For day-of-week:
DAYOFWEEKISO(date_column)-1+ Format={0:ddd}(0=Sun, 1=Mon, 2=Tue etc) or{0:dddd}(0=Sunday, 1=Monday, 2=Tuesday etc) - For quarter:
QUARTER(date_column) - For week-of-year:
WEEKISO(date_column)
- For year: